Tuesday, June 30, 2009

Lina's Tag


This is another of Lina's tags. She has used her Spellbinders dies to cut and emboss the tag and circle on this tag.
I love the butterfly. Lina has coloured it herself. She spends many hours colouring these images at my crops. Look at the effect-it is so worth the time and effort.

Monday, June 29, 2009

Lina's Tag


Here is a tag made by Lina.

She has used her oval die from Spellbinders to cut and emboss the Joy tag. Love the stamp.

Sunday, June 28, 2009

Cropworks and Blog Challenges

This is the sketch for TPE Challenge # 20. This sketch opens itself to many possibilities. It would make a great layout and quite a few options for cards. See what the design team have come up with and of course visit the blogs of those who enter. Here is another card I have made for this challenge.


Recipe:
Bazzill Dotted Swiss card in 2 colours
Card blank
Corner rounder punch
4 brads
Rub Ons
Button
Strip of Kaisercraft card
Button

Method:
Cut the darker of your 2 colours to fit the front of the card blank exactly and adhere.
Cut the lighter of the 2 colours to 14cm x 9cm and use your punch to round the corners.
Mark a point at 7cm on long edge and 4.5cm on short edge.
Cut 2 x 7mm wide and adhere to lighter card at your midway marked points. Trim off any excess.
Insert your brads as shown in the picture. I have a brad punch so it's easier to centre and push your brads through if you use one.
Use your Rub Ons to add a sentiment and/or a flourish or other embellishment.
Adhere the lighter coloured card stock to the card making sure you centre it.
With your strip of 30cm card/paper cut it approximately 2cm wide.
Use a scorer or the scoring tool on your trimmer and score every centimeter along the 30cm strip. Now fan fold the piece of card and add adhesive to one end and adhere the ends together.
Fold the strip up again and push one side down to form a circle. Make sure it all meets in the middle. Now this can be a little fiddly but it is worthwhile persevering.. Use glue or Gel Medium to adhere it to the centre of your card and then adhere the button to the centre of your flower.

Note: All the products used to make this card can be obtained from Rose-Anne at Cropworks.
by Libby

Saturday, June 27, 2009

Lina's Tag


This is another of Lina's tags. She is so creative and pays attention to detail. Lina has used her Spellbinders Dies to cut and emboss. The stamped image looks like it has been hand stitched but Lina did little lines to make it look like that. She has used Kaisercraft pearls she bought from Cropworks.
Love the quote from Marie Curie. Such an inspirational women in her time.It is a pity she didn't understand the harm the radium would cause her health by carrying a lump of it in her pocket.She never feared it but through her we gained a wonderful knowledge about radioactive materials.

Rose-Anne's Tag


Here is the Inspiration Quote Tag made by me.

I have used Basic Grey patterned paper and SALT flowers. Some Kindy Glitz, pinecone Versa Color ink and the rest are unknown sources.

Friday, June 26, 2009

Dianne's tag


I love this 3D effect of the flower. This is one of my favourite tags. I love flowers.

Thursday, June 25, 2009

Dianne's Tag


This is Dianne's tag swap. Love the flower position and the shading around the edges.

Wednesday, June 24, 2009

Dianne's Tag


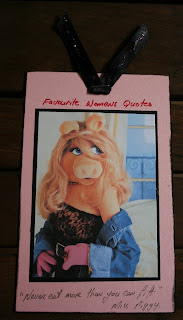
Don't you love this tag???? Famous women quotes -Miss Piggy
"Never eat more than you can lift." LOL.This is July's tag swap. Dianne is ahead of time.

Tuesday, June 23, 2009

Libby's tag


Here is the tag Libby made for June. Love the Martha Stewart punch and the Cuttlebugged background. The cardstock, ric rak, flower and gem are all from Cropworks.

Monday, June 22, 2009

Card for 'Dad'Bazzill Dotted Swiss Card

Here is a card using the new Bazzill Dotted Swiss Card- Rose-Anne has some beautiful colours in this range.


Recipe:
Bazzill textured card stock (brown)
Bazzill Dotted Swiss card stock (new - 2 greens)Buttons
Dimensional Magic
Cuttlebug Alphabet - Olivet
A2 Cuttlebug Embossing Folder - Tiny Mosaic


Method:
Cut your brown Bazzill to the desired size
Cut your a pieces of Bazzill green smaller than the brown
Cut your 2nd piece of green smaller than the other green
Cut a diamond (mine is 5cm square)Adhere the card pieces in order
Run a scrap of brown card through your Cuttlebug and cut the letters you need
Now carefully place the letters inside your Cuttlebug folder and emboss
Attach your letters to the diamond (I used my Xyron to add adhesive to the letters)
Carefully cover the letters in Dimensional Magic
Use a dot of Dimensional Magic in each corner of the light green Bazzill and drop a button onto each dot.


Tips:
Dimensional Magic doubles well as a glue for this type of project.Bazzill Dotted Swiss card is wonderful and I will be using some more soon.
Male themed cards don't have to be difficult to do. Check out some card sketches/maps and use appropriate colours and you will come up with some great cards.
Don't forget to use the Internet for poems, sayings etc.
You could print a quote out and distress it with ink or chalk around the edges and then layer it on some card and use dots under it to give it dimension.

You can buy all the products for this card from Rose-Anne at Cropworks.

by Libby

Saturday, June 20, 2009

Cuttlebug card with Kaisercraft and Fan Fold Flower

All the items I used to make the card above, you can purchase from Rose-Anne at Cropworks.

Recipe:
  • Bazzill cardstock - textured
  • Kaiserscrapbook Clear Stamps - Fancy Flourishes
  • Versa color burgundy ink
  • A2 Cuttlebug Embossing folder - Swiss dots
  • Coloured pencils
  • Rick rack braid
  • Button
  • Strip of coordinated paper 12"x 1 (30cm x 2.5cm)
  • Kaiser craft cutter with straight and scoring blades
  • Gel Medium

Method:

  • Cut the Bazzill to desired size and fold.
  • Ink up your stamp and place in top right hand corner of card.
  • Use the Prisma coloured pencils to add colour and depth to your flourish - if you use the textured card stock when you have coloured the image it almost looks like cross-stitch!
  • Now place the front of the card in the Cuttlebug inside your folder and run it through.
  • Now add your rick-rack to desired position on card. I used 3mm double sided tape (you can get a range of widths from Rose-Anne)
  • After you have cut your coordinating card 12"x 1" (30cm x 2.5cm), use a scorer to score a crease every 1cm.
  • Now fold the strip like you would if making a paper fan.
  • Adhere the 2 ends of the fan folded card together (I used double sided tape but you can used glue - jut let it dry).
  • Push the inside edge into the middle while gently encouraging the outside edge to sit flat on the card. I find once you get the centre of the flower right the rest follows. I use a wide circle of glue or Gel Medium and hold the flower in place until it's stuck. You can gently place a heavy object on the flower, make sure it's well balanced and leave until glue/Gel Medium is dry.
  • Choose a button and using Gel Medium adhere it to the middle of your flower.

Tips:

  • Gel Medium is a fantastic product, it can be used as a glue, a transparent coat over a creation to help protect it, you can mix it with paint to gain a more vibrant effect and many other uses. Well worth having in your stash.
  • Double sided tape comes in a variety of sizes - 3mm, 6mm, 12mm, 18mm, 24mm, 36mm and 48mm. It is quite versatile as it is acid free and you can tear it (don't need scissors). It suitable for hand application, heat resistant and is ideal for framing and scrapbooking applications. Better still if you have die cuts you can use in a Cuttlebug or similar machine, place the double sided tape on the back of the card, run it through to cut the shape and the tape will be cut as well and the die cut is then ready to apply to your project - no more fiddly bits to try and stick down.
  • Make your flower out of any small strips of card or paper you have - ideal use for off cuts. You could also distress the card on the edges or 'mountains' for added depth and colour. Experiment and you'll be amazed with what you come up with. The width of the strip determined the size of your flower.

Libby

OTP Design Team Member

Thursday, June 18, 2009

Our Stories Layout


Here is the girl version of the layout I did as a class at SWS camp in May. The patterned paper is Treehouse Memories. The biggest flowers are chipboard covered in patterned paper. The brown ones are stamped and cut out and the small white ones are from SALT.The letters are chipboard and are from SALT.The pearls are Kaisercraft.

Raine's Tag.


Here is the tag Raine made with an inspirational quote. Raine is one month ahead of time. This is a beautiful tag. Love the embossed background done with the Cuttlebug.

Rose-Anne's Mother's Day Tag.


Here is the tag I made for the Mother's Day Tag. I always associate pink with Mother's day.

Libby's Tags


Here are 2 tags made by Libby. I love the Mother's day Tags. Mothers are so special.
Blog Widget by LinkWithin
 

blogger templates | Make Money Online