Monday, August 31, 2009

Who is this woman?

Who is this woman and where was she when this was taken. This is the same woman who was hiding behind the bushes at a camp last year and dressed in pink.
Keep tuned for more photos.

Raine's August tag


August was a quote about Joy. Raine chose her precious family to be the focus about Joy.
Notice the Cuttlebugged sentiment at the bottom.
The tag is made from Bazzill cardstock. This is a lovely card.

Sunday, August 30, 2009

Dianne's September Tag

As you know September is father's day here in Australia. So the tag for this month is something about Dad.
The eyelet is a great way to thread the ribbon for a different affect. Notice the corners punched out. This punch from bought from Cropworks.
The brown and blue theme is a good choice of colour for a male. Another great job.

Saturday, August 29, 2009

Dianne's June Tag

This is the tag Dianne made for our June Tag swap. The vellum works well with this tag. Good job Dianne.
The brad is a flower brad that we have in various colours.

Friday, August 28, 2009

Libby's August Tag


Libby has used Sassafras Lass patterned paper for her tag. She has hand cut the butterfly and bent the wings so it looks like it is flying. Her quotes are written on vellum.
The pink brads were purchased from Cropworks and they come in many colours and in 3 different sizes. They match a range of cardstock we also have.

Thursday, August 27, 2009

Crossed Paths Paper Layout


Here is a layout I did for last weekend to show the girls this patterned paper from Crossed paths. The beauty of it is the title of the layout was already on the paper. It also comes in blue and green. I love their patterned papers and some of the papers have lovely Biblical verses.

Tuesday, August 25, 2009

Summer Themed Card

The Pink Elephant Challenge Blog has a summer theme going for their current Challenge # 28.Pop on over and have a look at what the design team have come up with - some awesome projects to inspire you. I realised I don't have any real summer themed stamps or images. So I decided to use the above image and this is the card I am entering into the challenge.
Recipe:
Opalescent card
Black Bazzill
Black leather finish card
Silver card
Stazon Black Ink
Judi Kins 2285 H stamp
Tombow pens
Heidi Swapp large rhinestone flowers

You can purchase the card stock, ink and rhinestones from Rose-Anne at Cropworks.
I hope you like my interpretation of the challenge. I'd love you to leave me a comment. :))

I've shared some cards recently featuring dry embossing. Rose-Anne has some Cuttlebug A2 Embossing folders for sale at the moment, so if you'd like to give dry embossing a try, contact Rose-Anne and see what specials she is currently running on a limited range of Spellbinders and Cuttlebug folders.

By Libby

Monday, August 24, 2009

Cuttlebug & Core'dinations White Wash Dress Card


I know, I've gone dress crazy!! Don't you just love this new Core'dinations White Wash card stock? What a fantastic effect. Place your embossing folder so that the embossed side will come out on the white wash side of your card stock, then distress with sand paper. It brings out the lovely colour on the back of the card stock. You just have to get some of this card stock. It comes in the most beautiful assortment of colours. You can get it from Rose-Anne at Cropworks.


Recipe:
Core'dinations White Wash Card stock
Embossing folder and Cuttlebug
Dress Template
Sanding paper
Eyelet lace
Ribbon
Matching ribbon/ric-rac braid
Kaisercraft Rhinestones - clear

Method:
Using your template, trace onto card stock and cut - do not cut the shoulders as they are on the fold
Trim a small amount from the bottom of the front of card for lace
Dry emboss the front of the card and then sand it to bring the colour out.
Attach the lace to the wrong side of the front of the dress and thread through narrow ribbon/ric-rac braidEvenly space rhinestones across the bottom of the dress
Tie your ribbon and place a rhinestone in the centre of the knot
The blue flower embellishment is actually body art rhinestones - you never know what you can do with bargains if you're not thinking outside of the square :))

Sunday, August 23, 2009

Cuttlebug - dry & heat embossed card

Cuttlebug Challenge Blogspot have a shaped card challenge for their Be Inspired #45. I decided to make a dress for this challenge. I may make some other shaped cards too, it will depend on time.
Recipe:
Dress & Apron template
Opalescent card
Black card
A2 Cuttlebug Embossing Folder Love Language
A2 Cuttlebug Embossing Folder Textured Texture
Black Versacolor ink pad
Black Sparkle embossing powder
Prima flowersKaisercraft pearls
Ribbon - unknown

Method:
I designed the templates myself - it's fairly easy to do. Make it from paper first and then fold in half length ways to make sure both sides are symmetrical.
Take the Opalescent card and trace the dress onto it ensuring the shoulders are on the fold of the card. Cut around template - do not cut shoulders!!
Run the dress through your Cuttlebug with the Love Language folder.. I sponged the shoulders with a tiny bit of the black ink - I probably wouldn't do that again as I didn't like the effect :)Place 3 tiny pearls down the front of the bodice part of the dress.
Now take your black card and run it through with the Textile Texture folder.
Distress the embossed area with the black ink by just rubbing the ink over the raised area making sure it has a good coverage.
Now sprinkle the embossing powder, liberally, all over the surface.
Then use your heat gun to heat emboss.
Now adhere the black apron to the dress.
When you've done this make sure you trim off and excess white or black card you can see.
Tie your ribbon and adhere to the middle of the top of the apron.
Now position your flowers where desired and place pearls or rhinestones in their centers.

Tips:
If you were making this as an invitation you could use a small portion of dry and heat embossed card on the envelope so it all ties in together.
Try a different combination of folders - there are so many that would lend themselves to this design.
You can purchase most of the products used from Rose-Anne at Cropworks.

by Libby

Thursday, August 20, 2009

The Crafters Workshop Patterned Paper


Did you know that The Crafters Workshop also has patterned paper in cardstock thickness. It comes in 4 colour combo ranges. Pink, blue, mauve and yellow. This flourish paper is very versatile.
Products Used
The Crafters Workshop patterned paper
Bazzill Cardstock
Mauve Souffle pen to write on the photo and the tab.
A raft knife to cut the flourish so it goes over the photo.

Wednesday, August 19, 2009

Cooper the Builder

This layout is page 2 of a double layout of Cooper. Here is the link to page 1. Cooper.
Cappachino Bazzill cardstock can no longer be bought but Cropworks has a good supply of it. It is one of my favourite colours and textures.

Tuesday, August 18, 2009

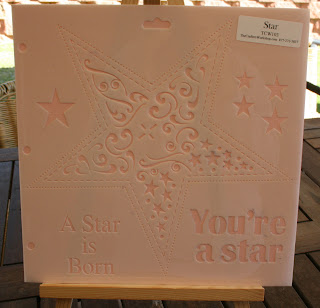
The Crafters Workshop Star Stencil


This layout was done using the star stencil from The Crafters Workshop. Even the title was there to trace around as well as the stars.

Monday, August 17, 2009

Self Adhesive Dies


This card was designed and made by
Rose-Anne. To see more of these cards visit her personal blog.
Products Used
SALT orange cardstock
Patterned paper
Kaisercraft Wooden stamps
SALT adhesive butterfly die
Kaisercraft pearls
Brown Versa Color Ink Cube.
All the products for this card can be purchased from Cropworks.

Sunday, August 16, 2009

The Crafters Workshop Stencil-Page 2


The same products were used as the previous layout except I used foam tape behind the matted photos to pop them up. This is a good way to get many photos on the one page. here there are 7. The popped up ones are trimmed, matted and placed.
Love The Crafters Workshop Stencils.
Cropworks has a big range of these in all sizes.

Saturday, August 15, 2009

The Crafters Workshop Stencils


This
layout was done using The Crafters Workshop Stencil called Dot Burst. There are so many uses for this stencil.I have used the dots to evenly space the holes for the eyelets around Cooper's face. The flourishes have also been done using the same stencil.
I outlined the flourishes in a pen and then went over them with Bronze Kindy Glitz.
The holes for the eyelets were done with an awl and then a Crop-O-Dial was used to punch them out. A Fiskars tool was used to set the eyelets.
Keep a watch out for other uses and ideas using this template plus others. They are one of my favourite tools.

Friday, August 14, 2009

Our Stories Boy Version.


This is a similar version to the layout I did of Jessica in the pink but a boy version.Click on the text below to see the girl version.
Products Used
Bazzill Brown Cardstock
Blue SALT cardstock
Treehouse memories Patterned Paper
Salt Chipboard stars
Brown Versa Color Ink
SALT chipboard letters
Kaisercraft pearls
White Souffle pens
HINT
Behind the photos and the brown and patterned paper shape I have cut out the areas that are not seen from behind and used these bits to cover the stars and punch more out. It saves money and also is lighter in weight and less bulky.
I have lightly sanded the edges of the chipboard stars

Wednesday, August 12, 2009

Kaisercraft Layout

Here's a layout I did for a Cyber Crop. We were given a picture as inspiration and had to take something from the picture and use it in our layout. Amie (my daughter) had all these photos of her Year 10 formal and some were light damaged etc so the best way around it was to cut off the bits I didn't need or couldn't use and make them all the same height and then make a mosaic out of it.


Recipe:

Making Memories Cheeky Shimmer Stickers
Kaisercraft card stock -Blushed - Desire
Prima Fancies Flip Flop Pink Flowers

You can purchase the supplies for this layout from Rose-Anne at Cropworks.
by Libby

Saturday, August 8, 2009

Core'dinations


We have just received a shipment of this cardstock. I love it. So much you can do with it. Check out the link below to see the range of colours that are available.

Also check out Rose-Anne's blog and see the card she made from one of the colours. It embosses nicely and sands just as nicely.

Cuttlebug and Core'dinations

http://209.200.66.155/index.php/products/whitewash-collection/


Tuesday, August 4, 2009

Cuttlebug Christmas Card


Here's another Christmas in July card that I have made.

Recipe:
Blue card for card base
Silver card for a mat
White card to emboss
Scraps of white card for snow
Kindy Glitz - Crystalline
A2 Cuttlebug Embossing Folder - Snowflakes
Cuttlebug Combo - Ice Crystal
Cuttlebug Die - Snowflake #2

All products can be purchased from Rose-Anne at Cropworks.

This card was quite easy to make. Just run your white card stock through with the embossing folder. Then, using up your scraps of white card run through with the die and cut two or three so you have a nice selection. Cut the Ice crystal and adhere all die cuts to your card front. Mount on the silver and then on your card front.
Carefully lift each 'stem' of the crystals/flakes so that they're not sitting on the card front. Add Kindy Glitz. Go back and ensure that all 'stems' are up off the card front and leave to dry.
If you're one of those that needs to go back and check to see if it's dry and in the process you wreck your work try this - using a scrap of card, put some Kindy Glitz on it in roughly the same amount as you use for your project and leave to one side. Then when the urge takes you to check, check the scrap and that way you're not running the risk of ruining your work.
This would also look lovely with the Winter House folder and glue the small stars and snowflakes onto the top of the card with the Winter House on the bottom and then use Kindy Glitz to embellish it. I don't have that folder to experiment with, so if you try it I'd love to see what you come up with - email me.
By Libby

Monday, August 3, 2009

Time for a Cuppa - Cuttlebug & Kaisercraft

I saw someone on another group with this and couldn't resist it. Mel Stamps lists 50+ Coffee/Tea Templates on her blog, so pop on over and check it out. The template was actually designed by Sherry Graves - thank you Sherry for being so generous with your templates shares.
This little mug would make a great gift idea for a friend or colleague. It would be great, also, for Christmas gifts. What better way than to present this little mug with chocolates and tea/coffee in it and wrapped in clear cellophane with a personalised hand made tag attached? It's always good to have a few spare projects just in case there is an unexpected occasion that you need something for.

Recipe:

Template
Pearlescent card (A4 size)
Kaisercraft Clear Stamps - Friends set
A2 Cuttlebug Embossing folder - Textured designs
Versa Color 158 Lapislazuu
Creative Memories tag punch
Ribbon

Method:
  • Print template off onto your A4 card
  • Cut out
  • Place the template into your Cuttlebug folder - I did it twice and each time matched up the lower edge of the folder which I placed on a 'seam' and then managed to get it to look like a continuous pattern
  • Place the handle through your Cuttlebug - do it when the handle is still open
  • Ink distress all areas
  • Using double sided tape or a strong adhesive like Gel Medium, adhere where indicated
  • using a scrap of card, punch the tag
  • Stamp the sentiment
  • Distress the edges of the tag with the ink and a sponge
  • Place a hole or slot in the top of the tag and thread through the ribbon
  • Ties the ribbon to the mug handle
  • Fill with goodies to give away.
All items used in this project can be purchased from Rose-Anne at Cropworks.
by Libby

Saturday, August 1, 2009

Cooper


This layout has been made from a variety of products
bought from Cropworks.
Products Used
GinX patterned paper
Bazzil cardstock-cappuccino
Cropworks cardstock-blue
SALT chipboard photo turns and brads
Brown Versa Color Ink
Blog Widget by LinkWithin
 

blogger templates | Make Money Online